Why I Make Composites for My Night Sky Photos

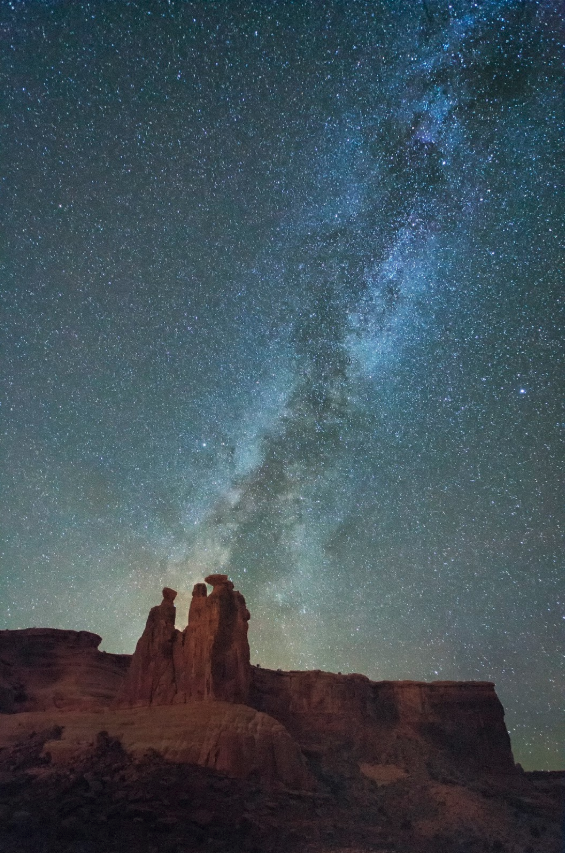
I enjoy making photos of the night sky, especially when the Milky Way is clearly visible. I usually try to shoot on clear moonless nights because I find that a moon produces too much light. Even a quarter moon lights up the sky and, as a result, dims the stars. Of course, the problem with shooting the night sky with so little light is that in order to light up the foreground, a long exposure is required. An exposure long enough to light up the foreground is too long to capture pinpoint stars.

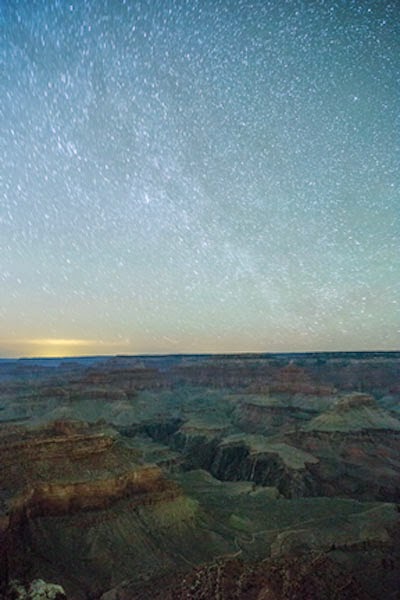
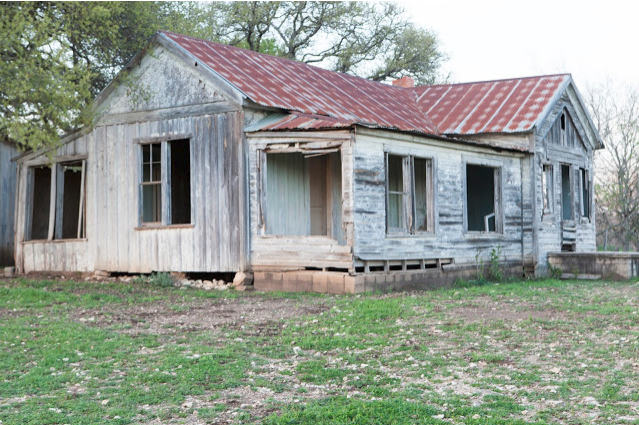
Exposure for the foreground.

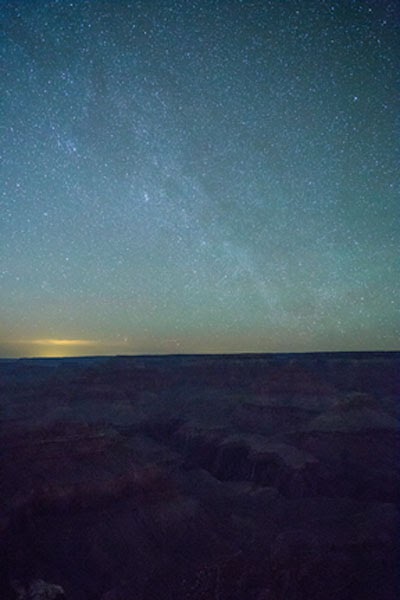
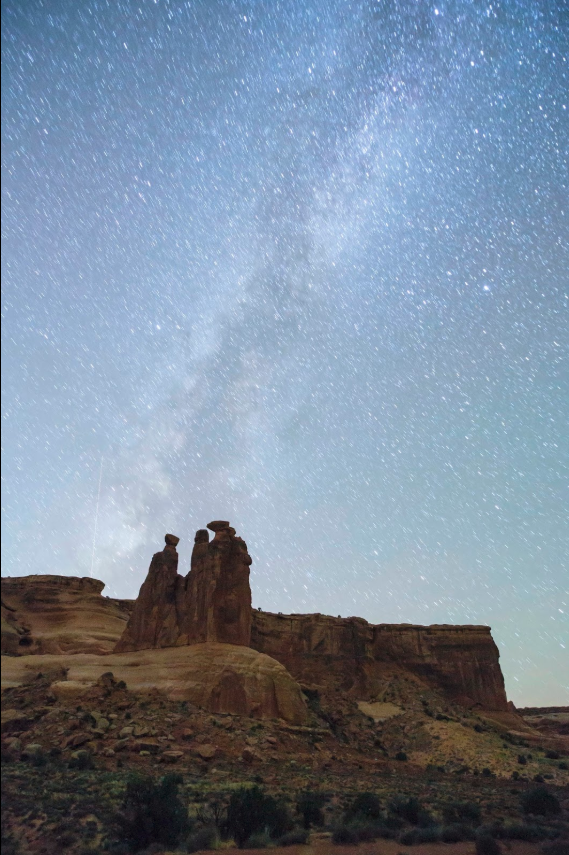
Exposure for the sky.

I photograph the night sky with a 14mm, 21mm or 24mm lens which means that I usually keep my exposures to 25 seconds or less. Anything longer than that will produce unacceptable star trails. Now star trails can make very nice photos but the exposure needs to be more like two and a half hours. A dark foreground can’t be captured satisfactorily in 25 seconds. Using Photoshop to increase the exposure for the foreground can work, but there is simply too much noise to make the shot acceptable.

 Either before or after I expose for the sky, I shoot the foreground. I’ve found that I like to have three stops of light greater than the exposure for the sky. Getting three stops requires about four minutes. (A one minute exposure doubles the 25 second exposure, two minutes doubles it again and a four minute exposure doubles it again for a total of three stops.)

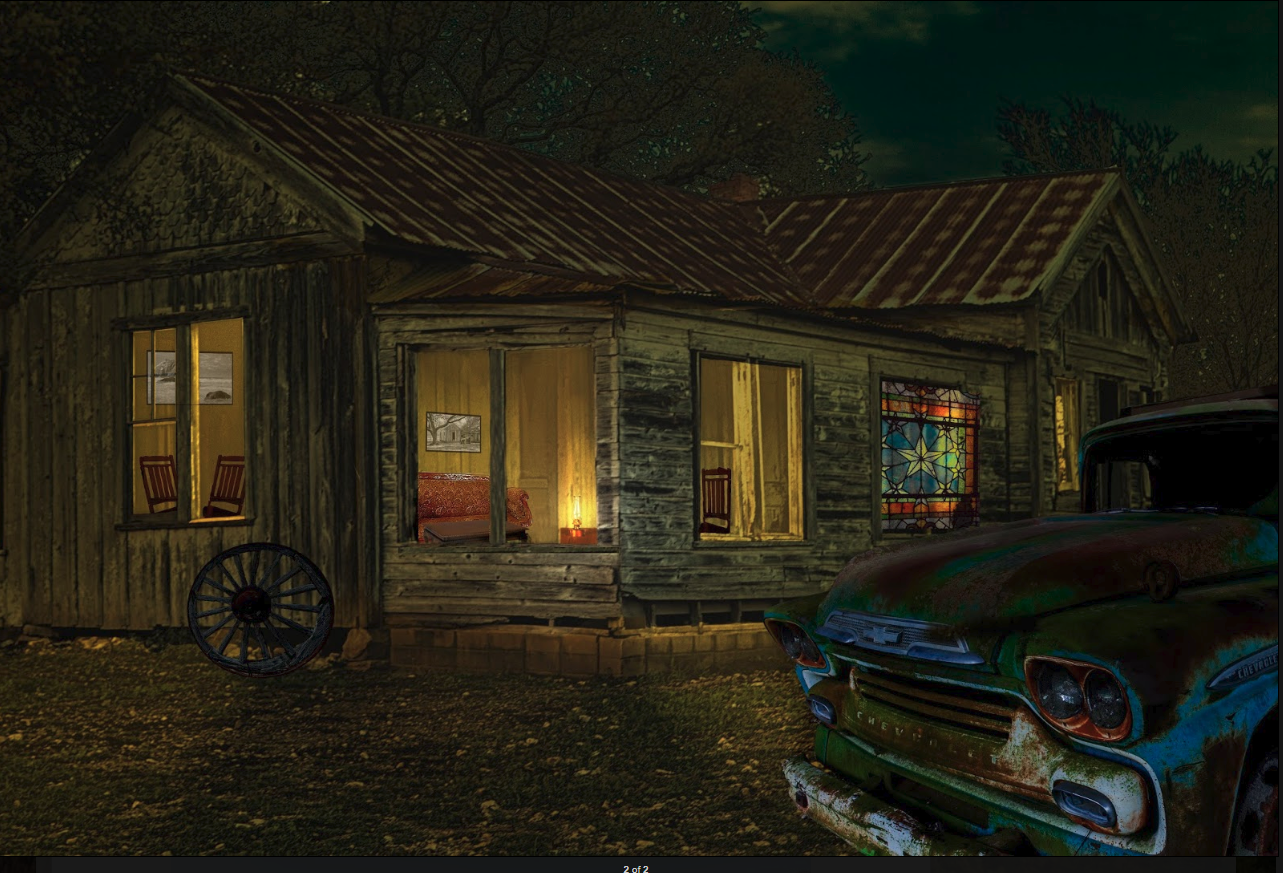
Compositing the two shots in Photoshop is relatively easy so long as the foreground isn’t too complicated.

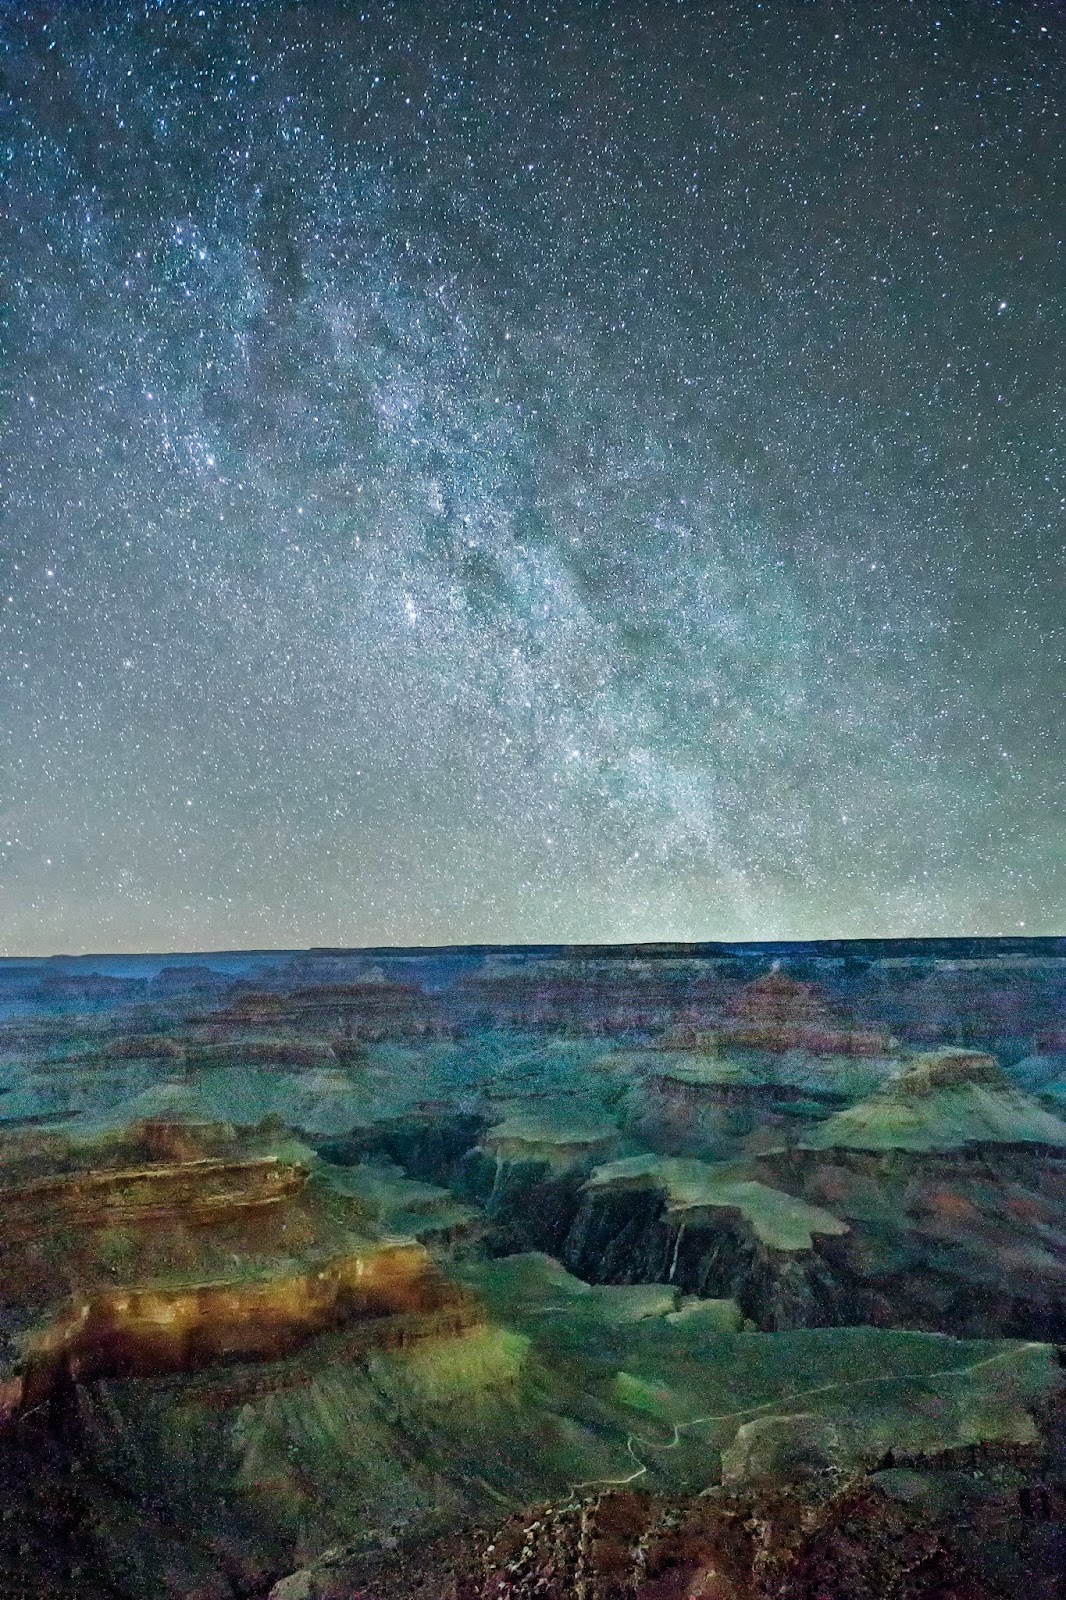
Here is he final composited image.

Easy Composite Strategy for Creating a Great Waterfall Shot

Waterfalls are one my favorite photographic subjects. I like to use slow shutter speeds to capture that flowing silky look. To do that, I try to use a 1/2 second exposure. If the water is flowing fast, a slightly faster shutter speed will accomplish a satisfactory result, but when possible I stick to a half second.

Unfortunately, such a slow shutter speed may eliminate a feature that a faster shutter speed would have caught. Look at the two photos below. The one on the top captured the look I wanted and while I like it a lot, one thing I liked about this waterfall was the foam that it created in the pool. A close look at the next photo reveals that I captured the detail in the pool that is missing from the the photo on the top. So does that mean I can’t have the best of both worlds? Not at all. Combining the best features of both photos is easily done. Here’s how.

In the field, you must use a tripod to capture the waterfall using different settings. It is important to get the exact same composition for each photo. That’s why a tripod is a must. For the photo on the top, I used a shutter speed of 1/2 second. For the other one, I shot at 1/60 second.

When shooting at slow shutter speeds, you will be using small apertures, like f-16, f-22 or even smaller. Small apertures will keep everything in focus. I made top image using an aperture of f-22. The lower shot was made at f-8. While everything in it is in acceptable focus, the foreground on the top photo much sharper.

Once you have your photos, open both of them in Photoshop. Click on Window, Arrange, Tile All Vertically. Photoshop will place both photos together on your screen. Click on the photo with the attributes you like most. (In this case, the top photo.) We’ll call it photo 1. Then press and hold the CTRL key, then press the J key. That will create a duplicate layer. Then select the Move tool. Using your mouse, grab the layer and move it over photo 2. Then press and hold the shift key and release the layer. Using the shift key will perfectly align that layer from photo 1 over the photo 2. When you’ve done that, close photo 1.

Now click on the add a layer mask icon. Here’s where the magic happens. Use a soft brush and set the opacity control to about 30%. Use it to paint over the area of the pool where the bubbles and foam are on the layer below it. Paint until you get the effect you are looking for. Here’s my final photo.

The Dreaded Orange Glow

The Dreaded Orange Glow

I like to photograph the night sky on clear, moonless nights when the only light comes from the canopy of stars. I also like to create composites for my final image. To do this I make exposures of about 3 minutes for the foreground and 25 seconds for the sky and combine them in Photoshop. 
Unfortunately, even on the darkest nights, the camera will capture the orange glow of a distant city.

The photo below, made from Yavapai Point at the Grand Canyon was exposed for three minutes. Notice that the canyon is properly exposed but the stars are forming trails because of the long exposure. Notice the glow in the sky just above the horizon on the left. It comes from the City of Las Vegas which is 175 straight line miles away. 

Here, the sky is exposed for the stars but the canyon is underexposed. The glow from Las Vegas is still clearly visible.

I combined the above two images to make this composite.

Here’s how I did it. First, I opened both photos in Adobe Camera Raw and made various adjustments. What they were is really not important because this article is about creating a composite from two images. What is important is that I made the same adjustments to both images. I’ve found that making separate adjustments for each layer tends to make the composite look fake and fixing it is more difficult than just using the same adjustments.

I opened both images in Photoshop. I made a copy of the image with the properly exposed foreground (CTRL J) and using the move tool, placed it as a layer on top of the image with the properly exposed sky. Using the quick selection tool, I made a selection of the sky. Because the intersection of the horizon and the plateau is virtually flat, the quick selection tool did a great job. With the sky selected, I held down the ALT key and clicked on the create a layer mask icon on the Layers pallet. That created a black mask which hid the selected the area on the top layer and revealed the selected area on the bottom layer creating the perfect composite.

But what about the glow from Las Vegas? Here’s how I fixed that. I simply selected the sky layer and then chose EDIT, TRANSFORM, SCALE and dragged the handle at the bottom corner to make the sky layer larger. I then used the move tool to move that layer down until the glow was below the foreground layer. With the original foreground selected and making sure I had selected white as the foreground layer, I clicked on the add layer mask icon. This action revealed the sky of the transformed layer.  It was a simple matter. Because the sky layer is larger, you can also move it from side to side to get that layer in the best position.

Is there a downside do using Transform? Yes, it has the effect of using a longer lens so the slight trailing in the stars from the 25 second exposure will be a bit larger but that will only matter if you decide to print an enlargement of your photo. But even then, depending on your camera, the effect will be minimal.

A Guy Can Quit

I previously posted an article entitled: “Sometimes a Guy Can’t Quit”. At the time, I thought I may have done everything I could have done with the photo of the old homestead at Berry Creek. As it turns out, I wasn’t done. I added a night sky and put some new furniture in it. I can’t think of anything more that could possibly be done, so I think I am finished. Here is the final image.

Sometimes a Guy Just Can’t Quit

I made this rather mundane photo of the old homestead at Berry Springs Park near Georgetown, Texas. 

Ordinarily I would just chalk this one up as a lost cause but this time I thought it might be interesting to turn it into a night photo, so I made adjustments in Photoshop to make it look like a night shot. Then I thought I should do some digital restoration and add some light to make it look lived in.

Light may make it look lived in but furniture and pictures on the wall seemed like a good idea to really make it look like someone lived there. I decided that the furniture should be something that would be found in an old homestead and decided that everything should be wood and the light source should be an old kerosene lamp. In keeping with the era, the photos on the wall needed to be in black and white. I took a couple of my photos, converted them to black and white and put them on the wall. The one in the room with the lamp is actually a photo of the homestead I made from the back.

To make it a bit more “rural”, I decided to add an old wagon wheel from photo I made in west Texas. Then I decided to dress up one of the windows by adding an image of a skylight window I made at the courthouse in Waco. I thought I was done but as I was going through some other photos, I thought I should add an old truck that I photographed in Walburg, Texas. I processed that photo to fit in. The problem though is that this 1958 Chevy truck wasn’t around in the early days of this homestead. I got to thinking that in west Texas, there are still a lot of ranch houses without water and electricity so the truck would fit.

At one point, I put a moon in the sky but it was too bright and actually detracted from the image, so I took it out.

Below is the final image. Is this really the final? I don’t know. I thought I had a final before I added the truck. It could be the final, but never say never.